
Recently while doing some bits and pieces around the containerization of various databases I found myself deploying RedHat® OpenShift®. I found in my case there were a number of caveats to make everything work as intended and so I decided to see if a step by step of my experience could be helpful to others. This blog post is focused on my environment which was made up of the following pieces:
- DNS services provided by a Windows Server® DNS
- A VMware vSphere® 7 environment with 3 VMware ESXi™ hosts
- A Linux system from which to customize and coordinate the installation
The intention is to install OpenShift 4.9.0 into a VMware vSphere environment with 6 worker nodes.
What is OpenShift?
OpenShift Container platform is an on-premises platform as a service developed by Red Hat. It is built around Linux containers which are orchestrated and managed by Kubernetes. The OpenShift Container Platform documentation provides more information on where and how it can be used.
Installing OpenShift Container Platform on VMware vSphere
All of the steps below are taken from the guide Installing a cluster on vSphere.
Obtaining software packages
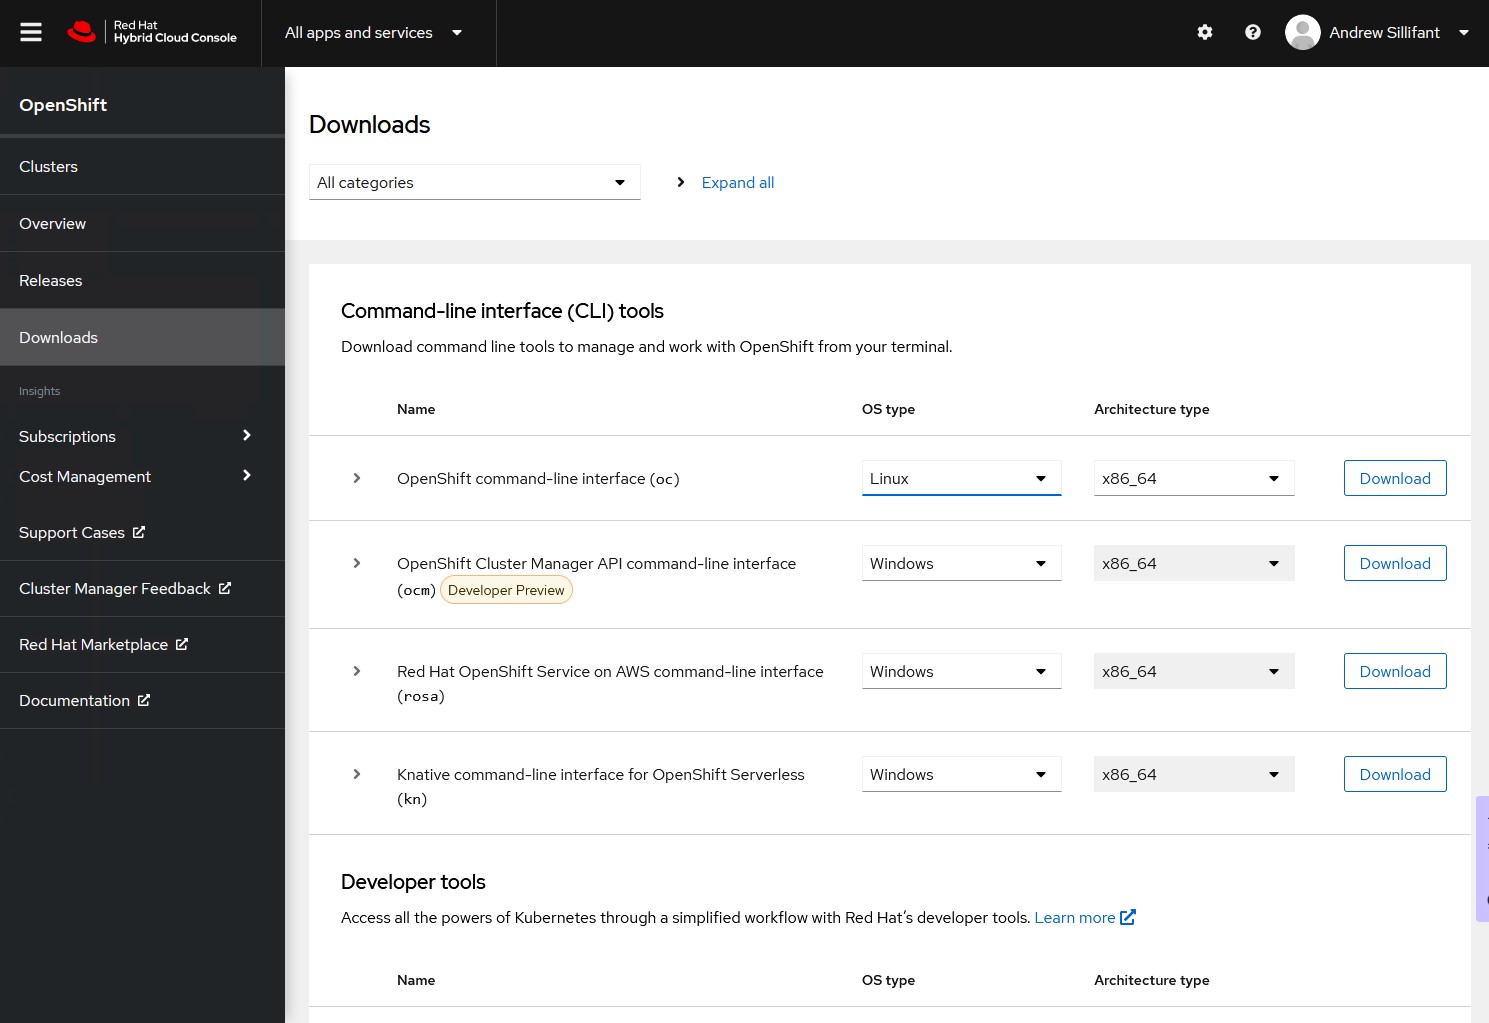
To obtain the software packages navigate to the RedHat Hybrid Cloud Console (Red Hat Login and entitlement required).
In this example I am getting both the client and open shift installer for Linux X86_64.
Navigate to the Downloads section and identify the download for the OpenShift command-line-interface(oc). Once identified download the package. If you are using the process as I did then the package downloaded should be named openshift-client-linux.tar.gz.

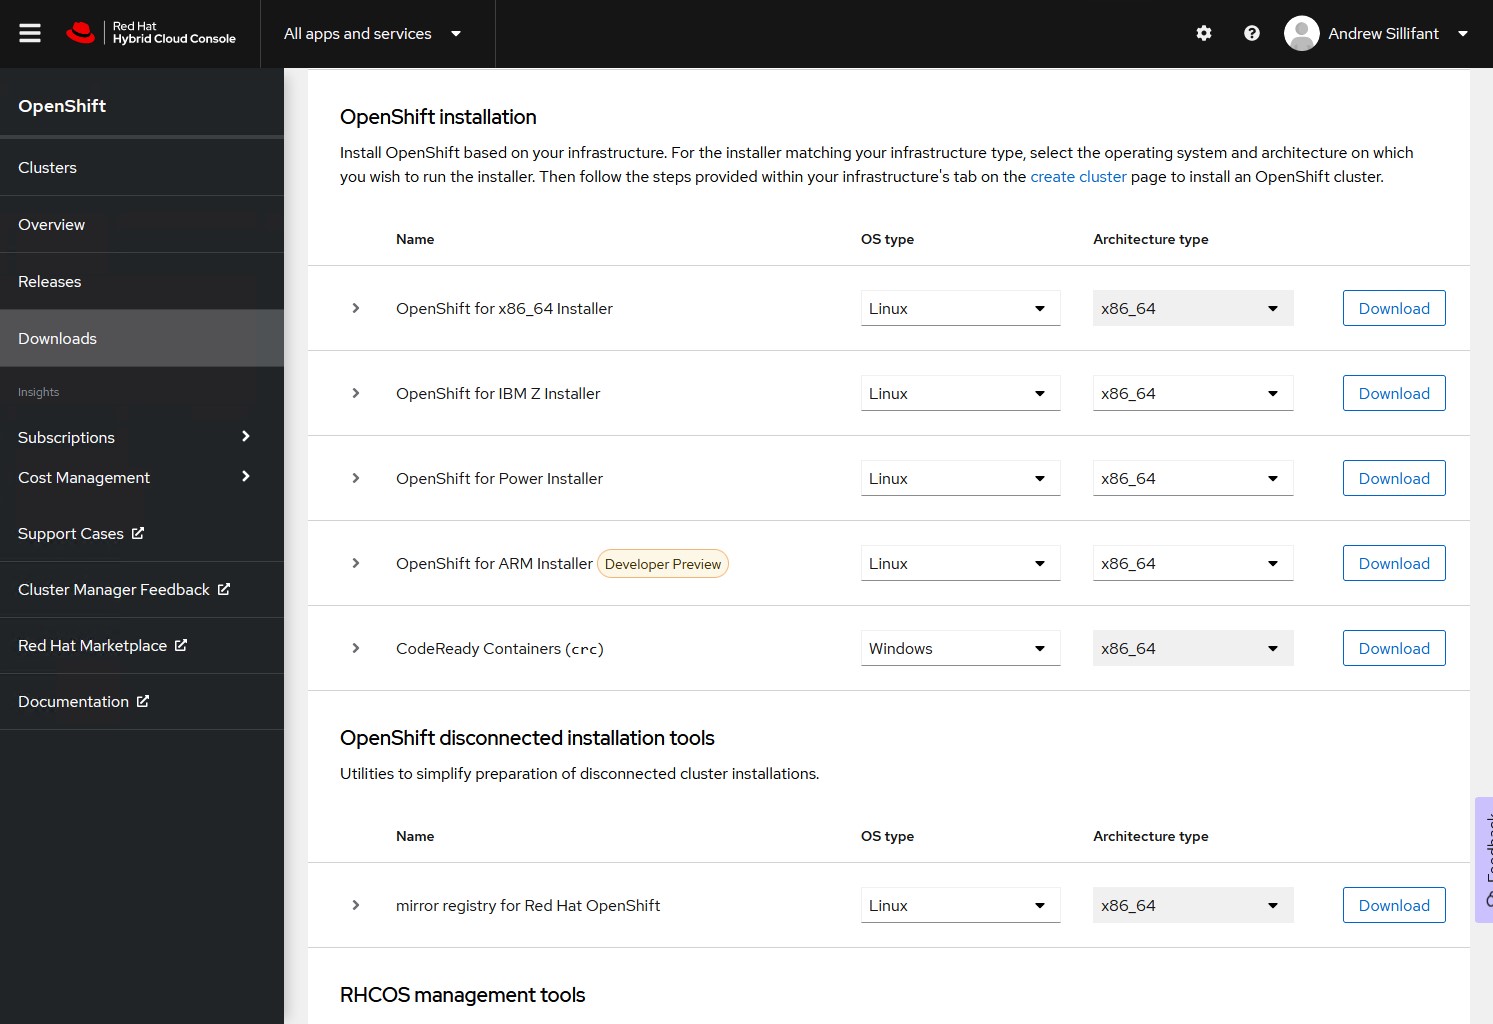
To obtain the installer identify the section containing OpenShift for x86_64 installer and download it. If you are using the process as I did then the package downloaded should be named openshift-install-linux.tar.gz.

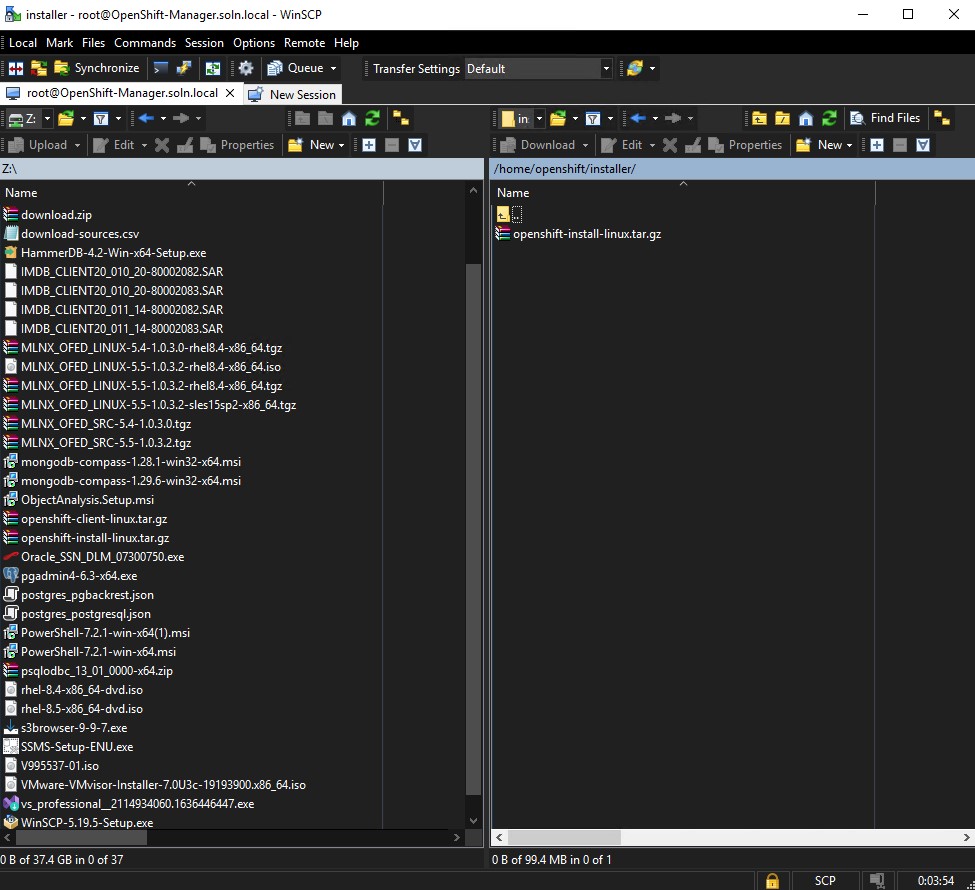
Once downloaded transfer the files to your intended system to install and manage everything from. I transferred everything to /home/openshift and then created subdirectories for the client and installer packages.
Assign IP Addresses and DNS records
The networking requirements specify that in addition to two static IP addresses (one for an API address and another for an ingress address) a DHCP server is configured to provide persistent IP addresses to the cluster machines. In my deployment my DHCP server and DNS servers are one in the same.
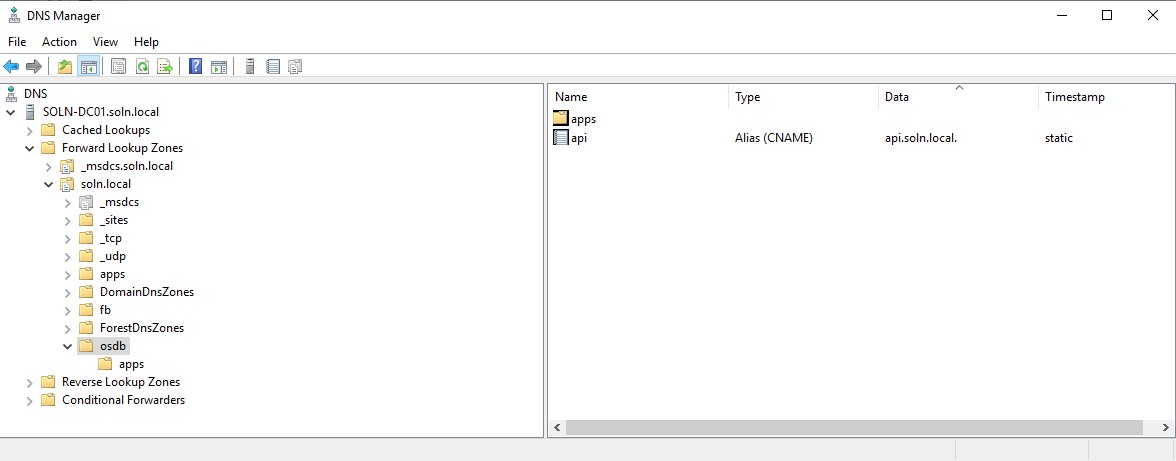
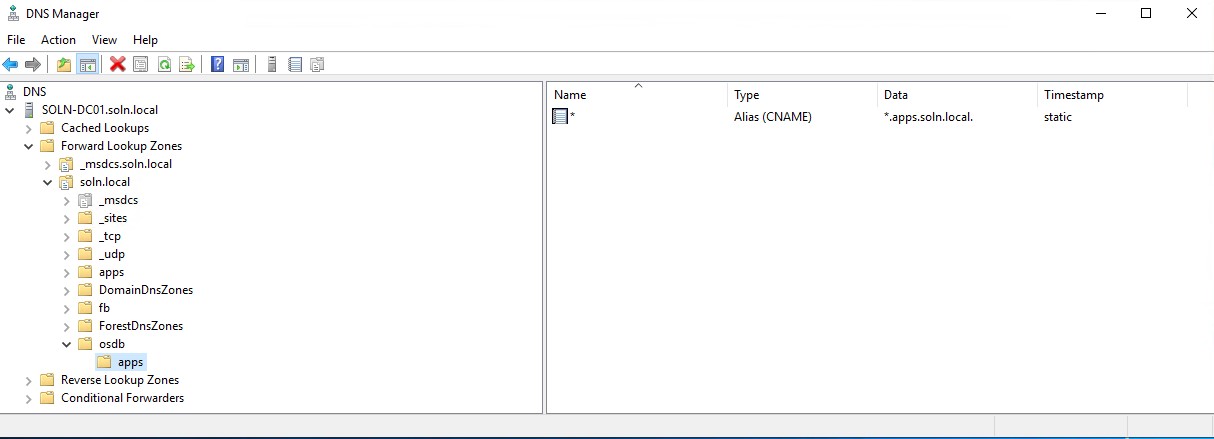
The static IP addresses need to have assigned DNS entries for them. Where one of my first failures occurred was that I created the entries in the base domain (soln.local) and the cluster is expecting the DNS entry to be of the form <component>.<cluster_name>.<base_domain>. Thus, before creating the DNS entries the cluster name needs to already be known and created in the base domain. In my installation process I used the cluster name osdb with entries for api and *.apps.
Generate a key pair for cluster node SSH access
The cluster I installed did not use a generated key pair for cluster node SSH access as it would be used for testing and documentation. However, for production environments this should be done. To generate the key pairs following this guide.
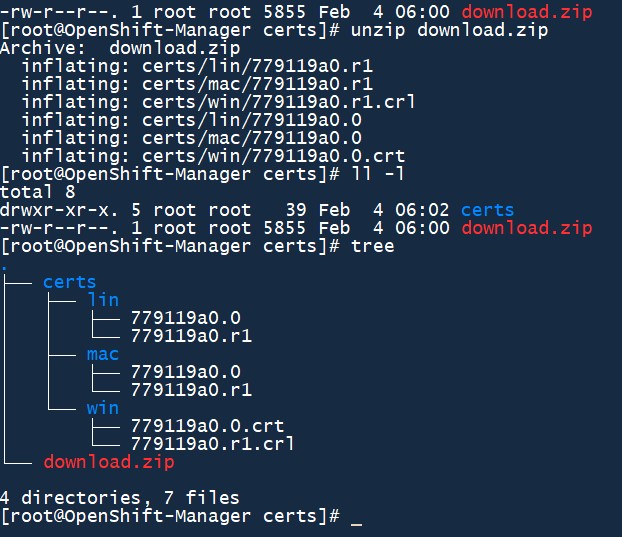
Add vCenter root CA certificates to system trust
One of my first reasons for failure occurred during the configuration part of running the OpenShift-installer. My vSphere environment uses self-signed certificates and thus the OpenShift installer would not connect to it. In order to use self-signed certificates I followed this process.
First I downloaded the certificates from the vCenter server by using wget at the following URL:
https://<vCenter_IP or DNS name>/certs/download.zip
Placing the URL into a web browser will also trigger the package to download.
After unzipping the package on the same system that the OpenShift-installer will run from the certificates can be copied from the relevant folder to the ca-trust for your operating system. The example below uses the same location and command set as Fedora. Once copied update the system trust with the relevant command.

Create the installation configuration file
Steps from here on assume that the packages have been copied to an empty location and decompressed/extracted using the relevant commands or software.
My cluster needed to have more systems than the default installation would provide. To do this the create install-config arguments are passed to the OpenShift installer. An empty directory also needs to be provided in the arguments as this is where the installation artefacts will be placed.
./openshift-install create install-config –dir=/home/openshift/installer/install-dir –log-level=info
After running the command, a number of prompts will ask for information about the intended cluster environment.
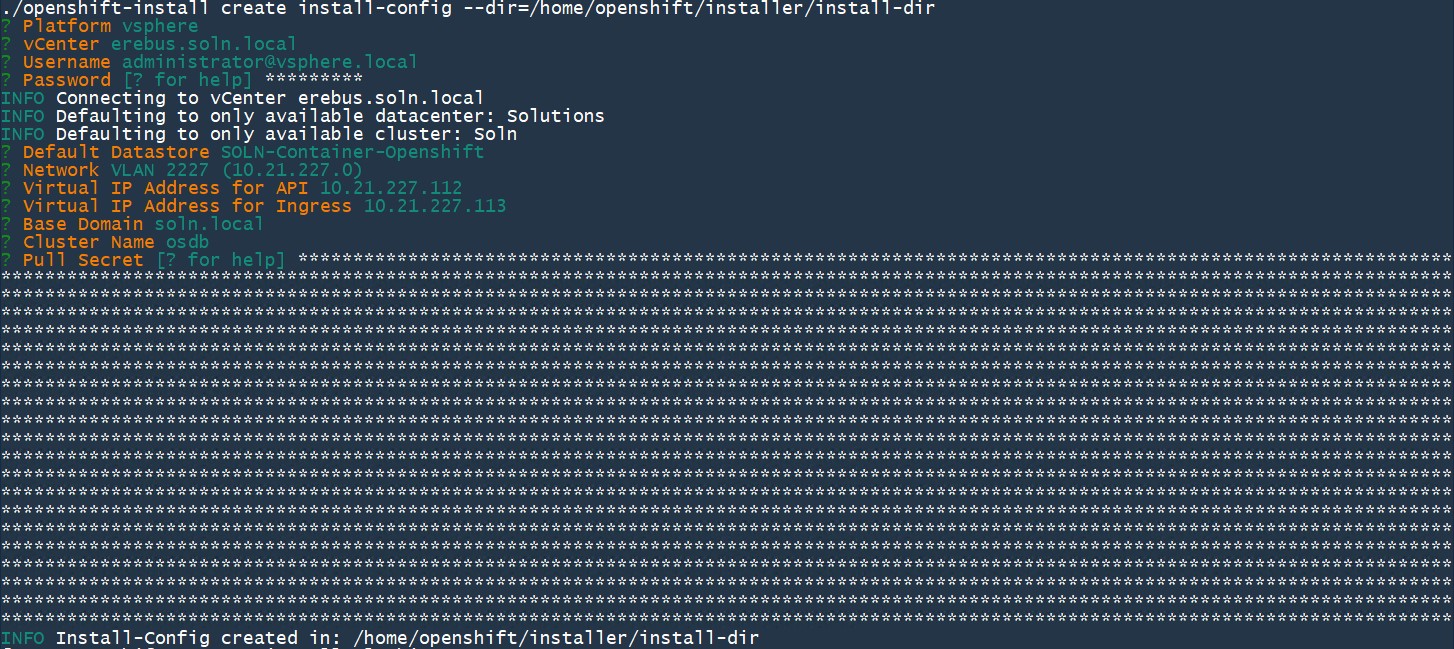
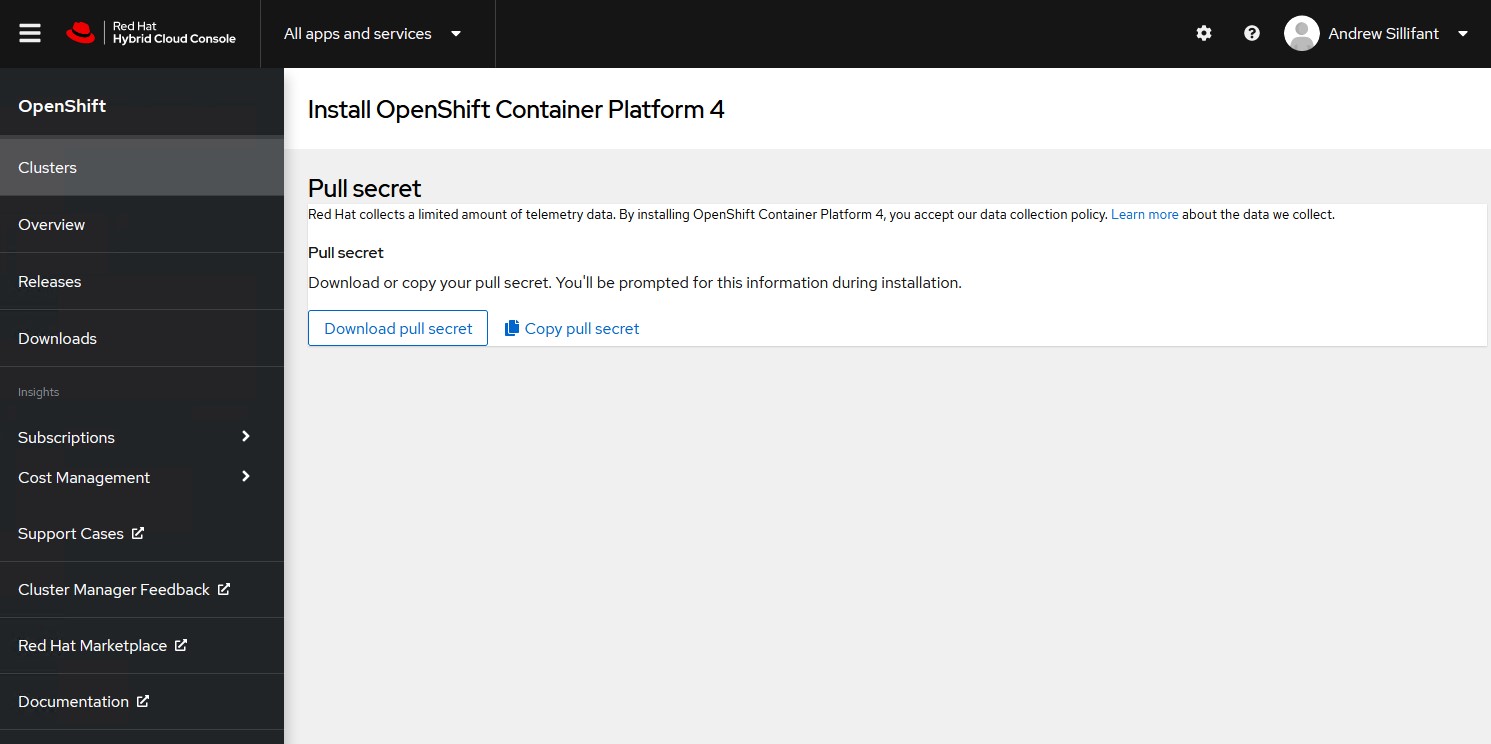
The Pull Secret can be obtained in the Red Hat Hybrid Console (Login and entitlement required).
At this point a configuration file is created in the install-dir folder. This file can be used to customise the OpenShift cluster prior to deployment.
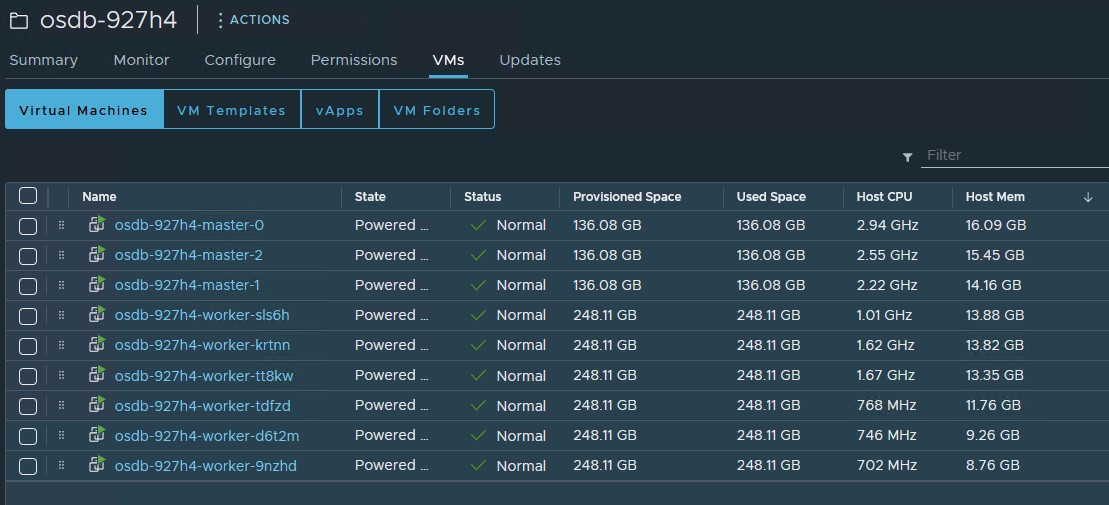
Using a text editor change the contents of the file to suit your needs. I required 6 worker nodes each with 32 CPU’s and 128GB of memory. I also increased the resources available to the master nodes.
apiVersion: v1
baseDomain: soln.local
compute:
- architecture: amd64
  hyperthreading: Enabled
  name: worker
  platform:
    vsphere:
      cpus: 32
      memoryMB: 131072
  replicas: 6
controlPlane:
  architecture: amd64
  hyperthreading: Enabled
  name: master
  platform:
    vsphere:
      cpus: 8
      memoryMB: 16384
  replicas: 3
metadata:
  creationTimestamp: null
  name: osdb
networking:
  clusterNetwork:
  - cidr: 10.128.0.0/14
    hostPrefix: 23
  machineNetwork:
  - cidr: 10.0.0.0/16
  networkType: OpenShiftSDN
  serviceNetwork:
  - 172.30.0.0/16
platform:
  vsphere:
    apiVIP: 10.21.227.112
    cluster: Soln
    datacenter: Solutions
    defaultDatastore: SOLN-Container-Openshift
    ingressVIP: 10.21.227.113
    network: VLAN 2227 (10.21.227.0)
    password: MyPasswordsAreVerySecure!!!
    username: [email protected]
    vCenter: erebus.soln.local
publish: External
Once the file has been edited, save it and proceed to creating the OpenShift cluster.
Create the cluster
At this point creating the cluster is very straightforward. All that needs to happen is the create-cluster argument be passed to the OpenShift installer with the directory location used in the prior step create the installation configuration file.
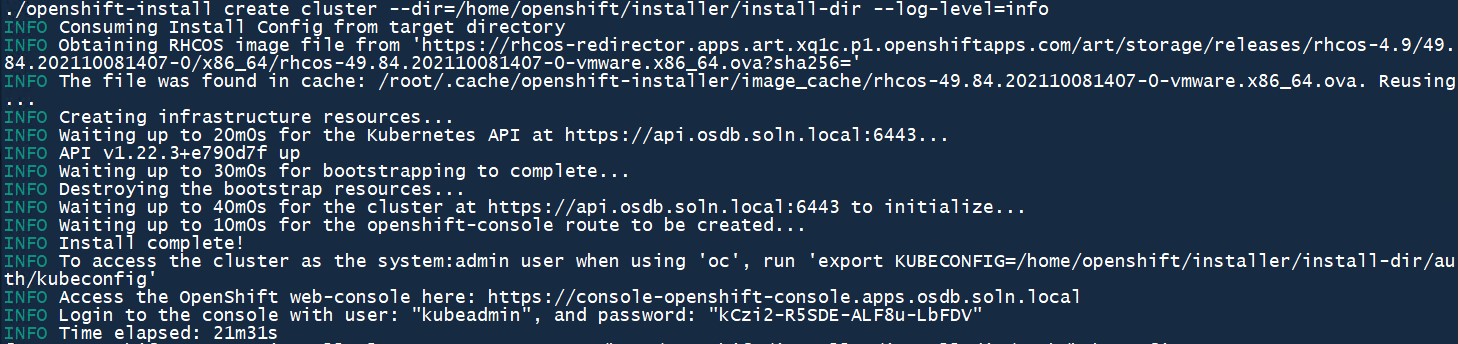
./openshift-install create cluster –dir=/home/openshift/installer/install-dir –log-level=info
Assuming everything proceeds well a number of new virtual machines will show up in your vSphere environment and the installer will provide a URL for the OpenShift web console accompanied by a password.
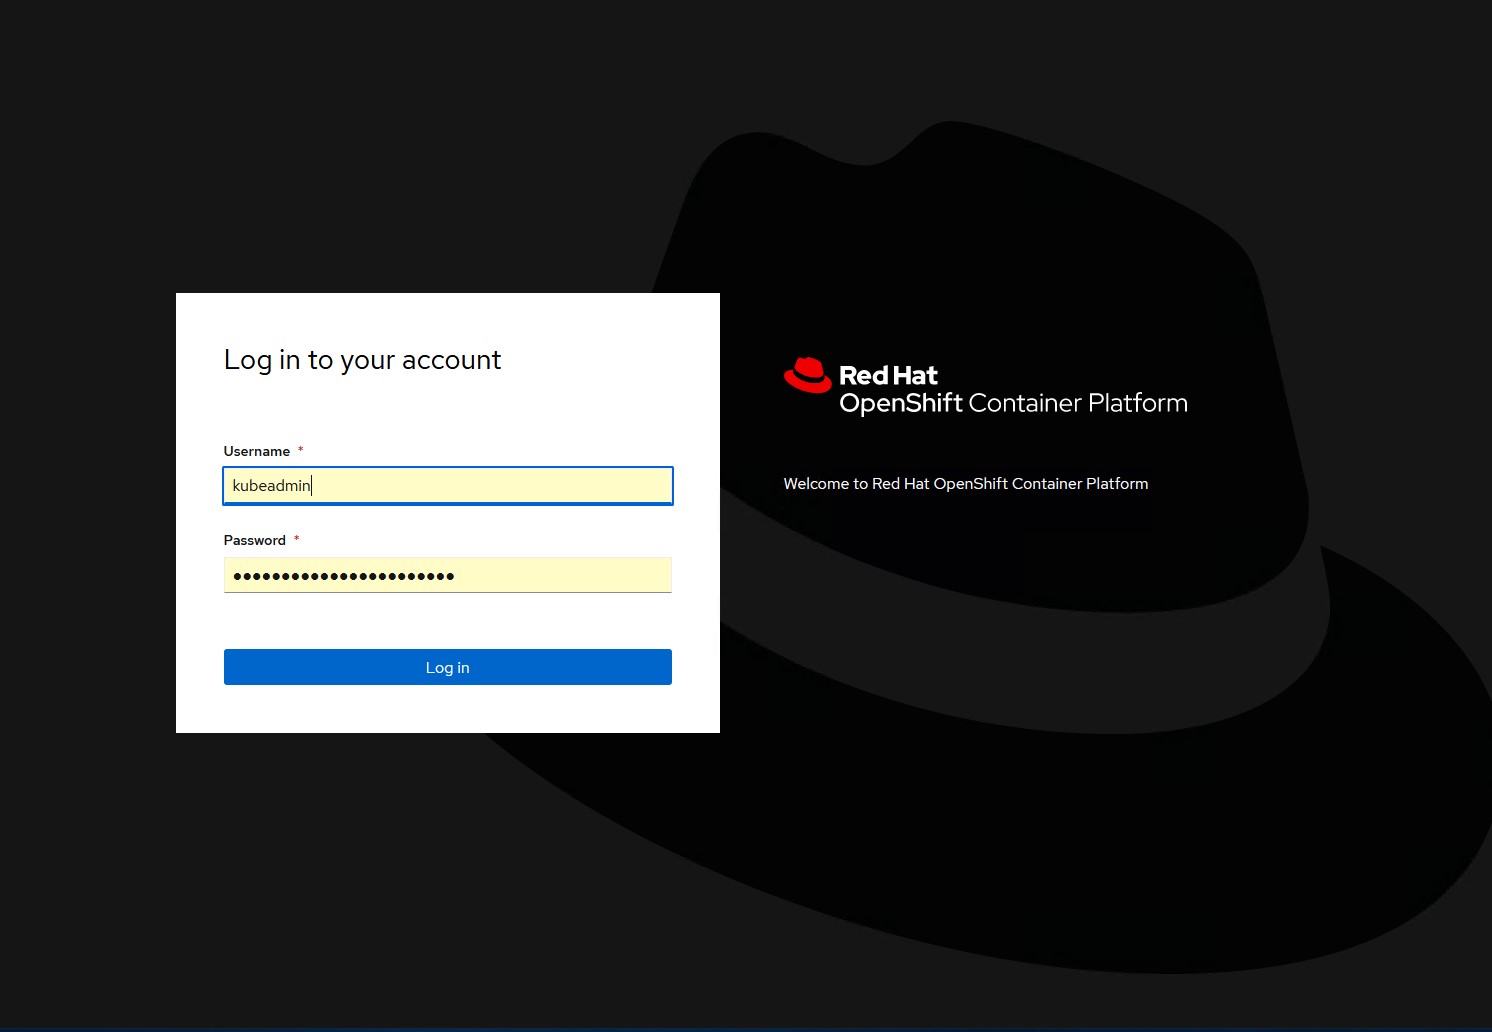
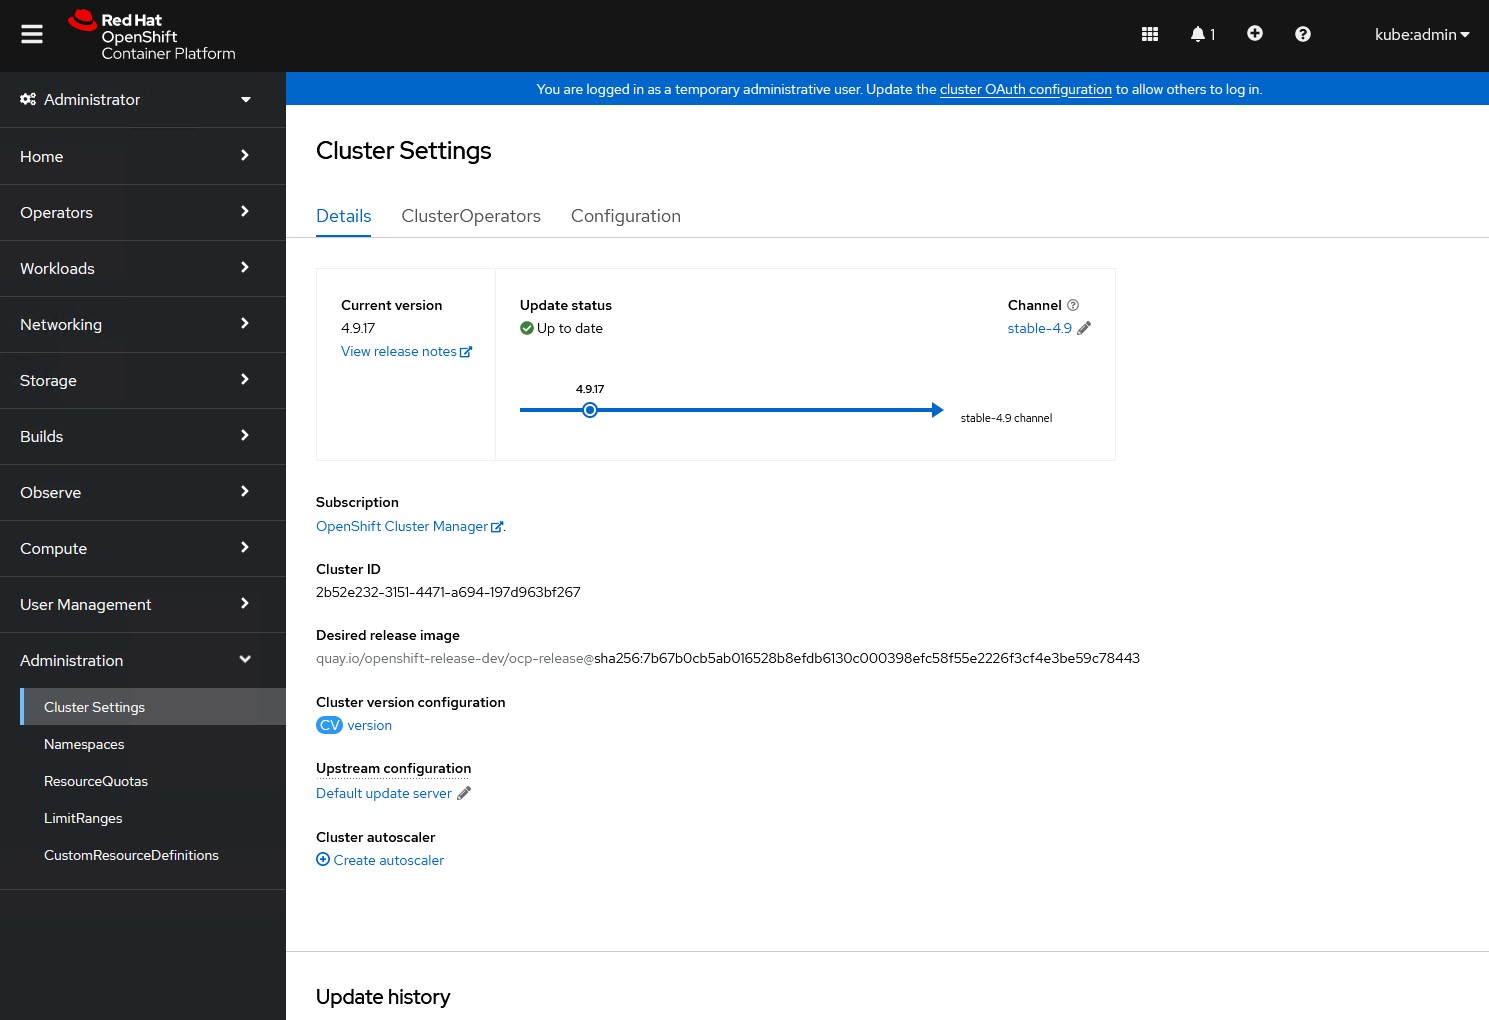
Login for the first time
At this point a web browser can be opened and the URL provided by the openshift-installer can be used to navigate to the web console. Using the credentials provided at the end of the installation will allow you to login.
And there you go, that’s a quick and easy way to deploy an OpenShift container platform cluster onto vSphere.