
MySQL and MariaDB are two very popular database engines (Source – DB-Engines Ranking). Both are open source (licensed as GPLv2 or proprietary for MySQL or LGPL for some scenarios with MariaDB) which allows for abundant support , lower software costs and no vendor lock-in.
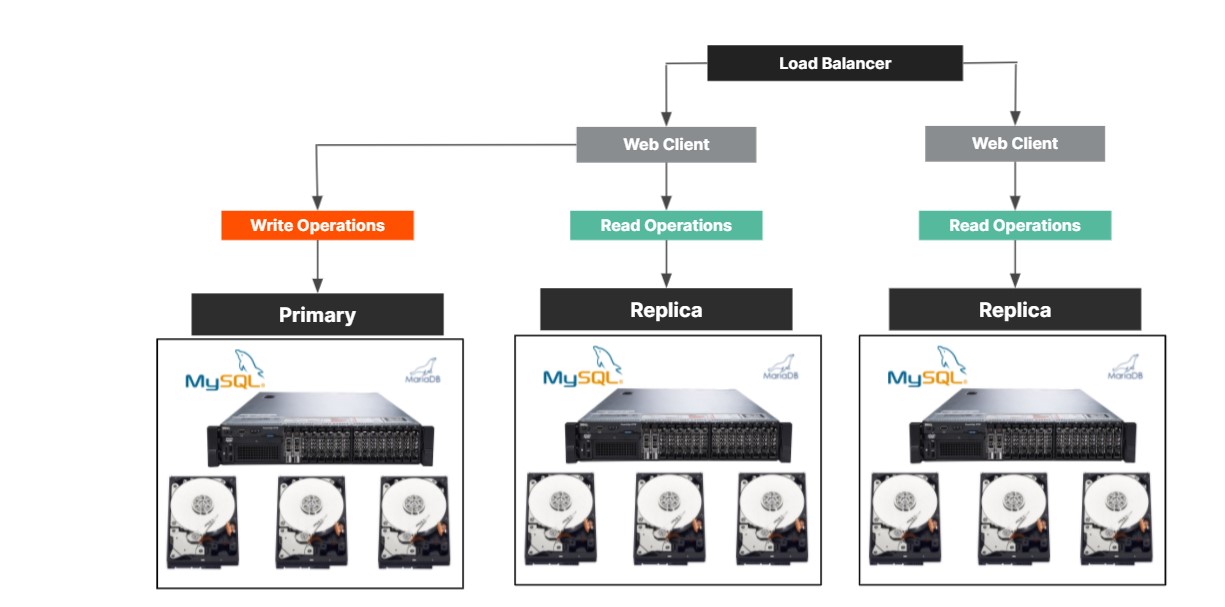
There are many reasons an organization would want to make use of replication. One reason would be read scaling where change operations are directed to a specific system and read operations could be directed to any one of many replicas in the environment , allowing for better query response times than a single system can provide. Another reason is to provide high availability , ensuring that if one system were to go offline access to the database would not be disrupted.
Replication is the act of creating copies of data in multiple redundant resources. For databases this requires any changes to object structures (tables , views , indexes, etc) to be copied and applied to separate database instances. MySQL and MariaDB offer replication capabilities which can provide high availability , disaster recovery or superior scalability.
Some important concepts to note before continuing:
- Binary Log File Based Replication – Changes to databases are written as events to a binary log file. The log files are then sent to any replicas. Each replica then decides which events it will apply to its local databases.
- Global Transaction Identifier (GTID) replication – Every transaction on the source system is recorded with a unique identifier. Each replica ensures that it applies the latest GTIDs thus ensuring consistency by matching its latest GTID to the GTID on the source system.
Replication Technologies
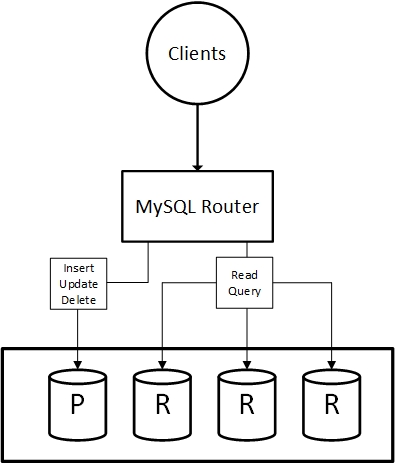
- (MySQL and MariaDB) Master/Slave or Primary/Replica Replication – One or more MySQL instances (replicas) capture database changes from a source instance and apply them to the databases locally on the replica. Replication can be performed using binary log file based replication or GTID based replication. This technique is only capable of having one MySQL instance receiving changes while all replicas are considered read-only. Replication is by default asynchronous but can be configured to be semisynchronous.
- (MySQL) Group Replication – A virtually synchronous replication capability provided as a plugin. Group replication can operate with multiple primary systems or a single primary with automatic election. Group replication uses GTIDs to communicate changes in the replication environment. Only the InnoDB storage engine is supported. Group Replication is one of the core components of InnoDB cluster.
- (MySQL) MySQL Cluster – While not necessarily a full replication solution MySQL cluster deserved to be mentioned. MySQL cluster is a distributed database solution that provides linear scalability and high availability. It uses the NDB storage engine to provision data nodes. SQL nodes are configured to access the cluster to store data intended for NDB tables but can also use the normal storage engines such as InnoDB locally. Any data which is placed in the NDB storage engine is automatically replicated to another data node in the cluster – thus ensuring availability.
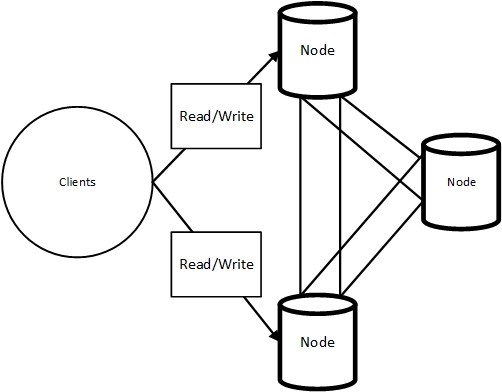
- (MySQL and MariaDB) Galera Cluster – A multi master synchronous replication technology. Any node in the cluster can be read from and written to as the changes will be broadcast to all other nodes. Galera Cluster is only available for Linux based deployments of MySQL and MariaDB as it is dependent on the mysql-wsrep patch. Only the InnoDB storage engine is supported.
Master/Slave or Primary/Replica Replication
Configuring the Source Instance
- Binary logging must be enabled. It can go to a different volume if required. Set log_bin = /var/log/mysql/mysql-bin.log if the different volume is required.Adjust as required for Microsoft Windows based deployments.
- Add “server-id-1” to the option file
- On the Source system a slave user needs to be created. This can be done with the following :
CREATE USER 'slaveuser'@'%' IDENTIFIED WITH sha256_password BY 'SuperSecretPassword';
GRANT REPLICATION SLAVE ON *.* TO slaveuser@'%';
FLUSH PRIVILEGES;
Something is a bit wrong with sha256_password in 8.0.24 and above , it wants to use chaching_sha256_password but replication will not accept this. It could be a bug.
- Now we should check the binary log position of the source system using the command SHOW MASTER STATUS;
mysql> show master status;
+---------------+----------+--------------+------------------+-------------------+
| File | Position | Binlog_Do_DB | Binlog_Ignore_DB | Executed_Gtid_Set |
+---------------+----------+--------------+------------------+-------------------+
| binlog.006775 | 156 | | | |
+---------------+----------+--------------+------------------+-------------------+
1 row in set (0.00 sec)
- Login to the MySQL shell and issue the command : FLUSH TABLES WITH READ LOCK; This will close and open the tables and then lock them for further changes.
- . Use mysqldump or the clone plugin to create a backup of all of the databases.
Configuring Replicas
On any replica perform the following steps :
- Add server-id = n to the option file, adjust n to the relevant replica number
- (Optional) Set the relay log file name in to the option file: relay-log=DB-01-relay-bin
- Execute the following to set the SOURCE or MASTER server, adjusting the properties as needed
CHANGE MASTER TO MASTER_HOST='10.21.227.31',
MASTER_USER='slaveuser',
MASTER_PASSWORD='SuperSecretPassword',
MASTER_LOG_FILE='binlog.006775', MASTER_LOG_POS=156;
from MySQL 8.0.23 onwards :
CHANGE REPLICATION SOURCE TO SOURCE_HOST='10.21.227.31',
SOURCE_USER='slaveuser',
SOURCE_PASSWORD='SuperSecretPassword',
SOURCE_LOG_FILE='binlog.006775', MASTER_LOG_POS=156;
- At this point the replica can be started , for MySQL 8.0.23 and later use the command : START REPLICA, for MySQL 8.0.22 and previous versions use the command : START SLAVE;
To see all connected slaves from the host system : SHOW SLAVE HOSTS; or from MySQL 8.0.23 To see all connected slaves from the host system : SHOW SLAVE HOSTS; or from MySQL 8.0.23 SHOW REPLICAS;
It might be necessary to set the report-host system variable to see the replica host names.
Group Replication
To create a replication group a number of servers with MySQL are formed using a group name (a UUID). The Group is dynamic where servers can join or leave voluntarily.
Group replication has a group membership service that keeps track of which servers are online and participating in the group.. The list of online servers/instances is referred to as a view.
One of the interesting points of group replication is that every table in the database(s) used for group replication must have a primary key.
Configuring the source system/first primary
- Add “server-id-1” to the option file
- Add “enforce_gtid_consistency=ON” to the option file
- Add “plugin_load_add=’group_replication.so‘” to the option file
- Generate a UUID from somewhere (the uuidgen command in Linux can provide this) and use that as the replication group name , Add “group_replication_group_name=”82b1c8c6-16fc-4241-9f86-869e9ff2cbb2” to the option file
- Add the local systems address as “group_replication_local_address=”xxx.xxx.xxx.xxx:33061“” to the option file.
- Add the other systems in the group as “group_replication_group_seeds=”xxx.xxx.xxx.xx1:33061, xxx.xxx.xxx.xx2:33061, xxx.xxx.xxx.xx3:33061, xxx.xxx.xxx.xx4:33061, xxx.xxx.xxx.xx5:33061” to the option file.
- Ensure that the group is not bootstrapped on startup using “group_replication_bootstrap_group=off” to the option file.
- Ensure the other storage engines are disabled by adding “group_replication_bootstrap_group=off” to the option file.
- Start the MySQL instance.
- Using the mysql root user execute the following , substituting password and user as needed (This is the user which will communicate between instances – note binary logging is disabled for this step to avoid creating unnecessary entries in the binary log):
SET SQL_LOG_BIN=0;
CREATE USER replication_user@'%' IDENTIFIED WITH sha256_password BY 'SuperSecretPassword';
GRANT REPLICATION SLAVE ON *.* TO  replication_user@'%';
GRANT BACKUP_ADMIN ON *.* TO  replication_user@'%';
FLUSH PRIVILEGES;
SET SQL_LOG_BIN=1;
CHANGE REPLICATION SOURCE TO SOURCE_USER='replication_user', SOURCE_PASSWORD='SuperSecretPassword' FOR CHANNEL 'group_replication_recovery';
- Set the group replication to bootstrap and start group replication using the following mysql command :
SET GLOBAL group_replication_bootstrap_group=ON;
START GROUP_REPLICATION;
SET GLOBAL group_replication_bootstrap_group=OFF;
- Check the replication group is up and running using the command SELECT MEMBER_ID, MEMBER_HOST, MEMBER_STATE FROM performance_schema.replication_group_members;
+--------------------------------------+--------------+--------------+
| MEMBER_ID | MEMBER_HOST | MEMBER_STATE |
+--------------------------------------+--------------+--------------+
| dca861bc-8662-11eb-996e-0025b5f10ace | 10.21.227.31 | ONLINE |
+--------------------------------------+--------------+--------------+
1 row in set (0.00 sec)
Configuring additional replicas
- On the replica to be added to the group add the following to the option file , ensure group_replication_local_address is updated for the local node IP Address
################################
# Group Replication Properties #
################################
server_id=2
gtid_mode=ON
enforce_gtid_consistency=ON
plugin_load_add='group_replication.so'
group_replication_group_name="82b1c8c6-16fc-4241-9f86-869e9ff2cbb2"
group_replication_start_on_boot=off
group_replication_local_address="xxx.xxx.xxx.xxx:33061"
group_replication_group_seeds="xxx.xxx.xxx.xx1:33061, xxx.xxx.xxx.xx2:33061, xxx.xxx.xxx.xx3:33061, xxx.xxx.xxx.xx4:33061, xxx.xxx.xxx.xx5:33061"
group_replication_bootstrap_group=off
disabled_storage_engines="MyISAM,BLACKHOLE,FEDERATED,ARCHIVE,MEMORY"
- The replica needs to seed the data from any existing ONLINE member. This is done either with mysqldump or cloning. Cloning is the faster method and will be done automatically when joining the group. To configure cloning follow these steps :
- Install the cloning plugin (On both the donor and the intended replica) with the following MySQL command : INSTALL PLUGIN clone SONAME ‘mysql_clone.so’;
- For cloning to work the replication user on the donor needs to have the BACKUP_ADMIN credential. This is already present in Step 10 of the first node setup. It is recommended that each node which will act as a donor to future nodes are giiven this permissions as well.
- Ensuring that the firewall is open for the specified port , group replication can be started. START GROUP_REPLICATION USER=’replication_user’, PASSWORD=’SuperSecretPassword’;
- The cloning process will start automatically and if used can be observed by querying the performance schema view with the following SQL command : SELECT STAGE, STATE, END_TIME FROM performance_schema.clone_progress;
+-----------+-----------+----------------------------+
| STAGE | STATE | END_TIME |
+-----------+-----------+----------------------------+
| DROP DATA | Completed | 2021-03-22 13:58:29.781893 |
| FILE COPY | Completed | 2021-03-22 18:17:48.413161 |
| PAGE COPY | Completed | 2021-03-22 18:17:48.747937 |
| REDO COPY | Completed | 2021-03-22 18:17:48.975538 |
| FILE SYNC | Completed | 2021-03-22 18:17:51.765445 |
| RESTART | Completed | 2021-03-22 18:18:01.865628 |
| RECOVERY | Completed | 2021-03-22 18:18:04.132782 |
+-----------+-----------+----------------------------+
- Once the seeding is complete the replica will join the replication group. This can be observed using the replication_group_members view in the performance_schema with this MySQL command : SELECT MEMBER_ID, MEMBER_HOST, MEMBER_STATE FROM performance_schema.replication_group_members;
+--------------------------------------+--------------+--------------+
| MEMBER_ID | MEMBER_HOST | MEMBER_STATE |
+--------------------------------------+--------------+--------------+
| 21c3685d-8b4b-11eb-9a98-0025b5f10aae | DB-02 | ONLINE |
| dca861bc-8662-11eb-996e-0025b5f10ace | 10.21.227.31 | ONLINE |
+--------------------------------------+--------------+--------------+
2 rows in set (0.00 sec)
If any errors occur which contain This member has more executed transactions than those present in the group then just reset the local binary log and GTID counters with the following :
STOP GROUP_REPLICATION;RESET SLAVE; RESET MASTER;
Galera Cluster
Galera Cluster can be deployed with MySQL or MariaDB. Synchronous multi-master replications allow for both read and write operations to be performed on any node in the cluster.
Node joining with Galera cluster is automatic where new (or existing nodes which have been down for some time will automatically be seeded with the newest database snapshot.
The below steps for how to deploy the galera cluster will be using MariaDB 10.5. As of MariaDB 10.1 or later the MySQL-wsrep patch has been merged into MariaDB which means the cluster can be created using the standard MariaDB packages and Galera wsrep provide package.
Cluster Instantiation
Before any nodes can join the cluster , it must first be instantiated. Instantiation is required in two scenarios , the first is setting up a new Galera Cluster and the second is starting the cluster again after all nodes have been completely shut down. It’s important to note that when starting a completely shut down cluster , the last node to leave must be the first to start.
The process of instantiating or starting a cluster is sometimes known as bootstrapping.
Galera Cluster uses specific terminology for how cluster nodes are provisioned. A State Snapshot Transfer (SST) is where a full copy of the database data from a specific node is sent to a new or outdated node. As SST can be done using both logical and physical transfer methods. A logical SST method is to use mysqldump to transfer data where a physical method can use tools such as mariabackup , rsync or Percona XtraBackup.
An Incremental State Transfer (IST) is used when an existing node rejoins the cluster and is updated with changes since it was last synchronized.
In the following example the cluster will be instantiated on DB-01(with the IP address 10.21.227.39) and then another node named DB-02 (with the IP address 10.21.227.40) will be added.
- Create or add the following to an option file :
# Galera Provider Configuration
wsrep_on=ON
wsrep_provider=/usr/lib64/galera-4/libgalera_smm.so
# Galera Cluster Configuration
wsrep_cluster_name=galera_cluster
wsrep_cluster_address=gcomm://10.21.227.39
# Galera Synchronization Configuration
wsrep_sst_method=rsync
# Galera Node Configuration
wsrep_node_address="10.21.227.39"
wsrep_node_name="DB-01"
- wsrep_cluster_address – The IP address or hostname of the local node where the cluster will be instantiated.
- wsrep_sst_method – The method in which new nodes will be provisioned.
- wsrep_node_address – The local node IP address or hostname.
- wsrep_node_name – A name for the local node.
- Start the first node from the command line with the command : galera_new_cluster or mysqld –wsrep-new-cluster
- Once the cluster is instantiated , the database will start automatically. Attempting to start MariaDB with the galera config properties set but without cluster instantiation will cause a startup failure
Adding Nodes to the Cluster
- Create or add the following to an option file :
# Galera Provider Configuration
wsrep_on=ON
wsrep_provider=/usr/lib64/galera-4/libgalera_smm.so
# Galera Cluster Configuration
wsrep_cluster_name=galera_cluster
wsrep_cluster_address=gcomm://10.21.227.39, 10.21.227.40
# Galera Synchronization Configuration
wsrep_sst_method=rsync
# Galera Node Configuration
wsrep_node_address="10.21.227.40"
wsrep_node_name="DB-02"
- Start the node with the command systemctl start mariadb.service. The Rsync process (if selected as the SST method) will begin immediately.